

Introduction
You’re standing in your kitchen at 6 PM, staring at chicken breasts that need to become dinner in the next 30 minutes. Your family is hungry, you want to serve something healthy, but you’re torn between three options: toss them in a hot pan with oil, pop them in the air fryer, or slide them into the oven. Each method promises different results, but which one actually delivers the healthiest meal for your family?
This dilemma hits home for millions of home cooks who want to balance convenience, taste, and nutrition. The truth is, the cooking method you choose can dramatically impact the nutritional value of your food, affecting everything from calorie content to vitamin retention. Some methods can increase harmful compounds while others preserve beneficial nutrients.
You’ll discover exactly how pan frying, air frying, and oven baking stack up against each other in terms of health benefits, nutritional impact, and practical considerations. We’ll break down the science behind each method, compare oil usage, examine nutrient retention, and give you the tools to make the healthiest choice for every meal you prepare.
Key Takeaways
- Air frying uses up to 80% less oil than traditional pan frying while maintaining similar taste and texture
- Oven baking at temperatures below 400°F preserves the most vitamins and minerals in vegetables and proteins
- Pan frying can increase calorie content by 50-100 calories per serving due to oil absorption
- Air frying reduces acrylamide formation by up to 90% compared to deep frying starchy foods
- Oven baking allows for better portion control and requires minimal added fats for most recipes
- Pan frying creates the most advanced glycation end products (AGEs) when cooking at high temperatures above 300°F
- Air fryers cook food 25-50% faster than conventional ovens, helping preserve heat-sensitive nutrients
- Each cooking method affects sodium retention differently, with oven baking allowing for better seasoning control
- The healthiest choice depends on the specific food type, with vegetables benefiting most from gentle oven roasting
- Combining methods strategically can maximize both nutrition and flavor while minimizing health risks
Cooking Methods and Health Impact Explained
Understanding How Heat and Fat Affect Food
Every cooking method changes food at a molecular level, affecting not just taste and texture but also nutritional value. When you apply heat to food, you’re triggering chemical reactions that can either enhance or diminish the health benefits of what you’re eating. The key factors that determine health impact are temperature, cooking time, fat content, and the formation of potentially harmful compounds.
The amount and type of fat used in cooking directly influences calorie density, nutrient absorption, and the creation of oxidized compounds. Meanwhile, cooking temperatures above certain thresholds can destroy beneficial vitamins while potentially forming compounds like acrylamide and advanced glycation end products that may pose health concerns when consumed regularly.
- Oil absorption: Determines final calorie content and can add 50-200 calories per serving depending on method
- Temperature control: Affects vitamin retention, with water-soluble vitamins degrading rapidly above 212°F
- Cooking time: Longer exposure to heat increases nutrient loss, particularly for delicate compounds like vitamin C
- Surface area exposure: More exposed surface creates more browning reactions, affecting both flavor and health compounds
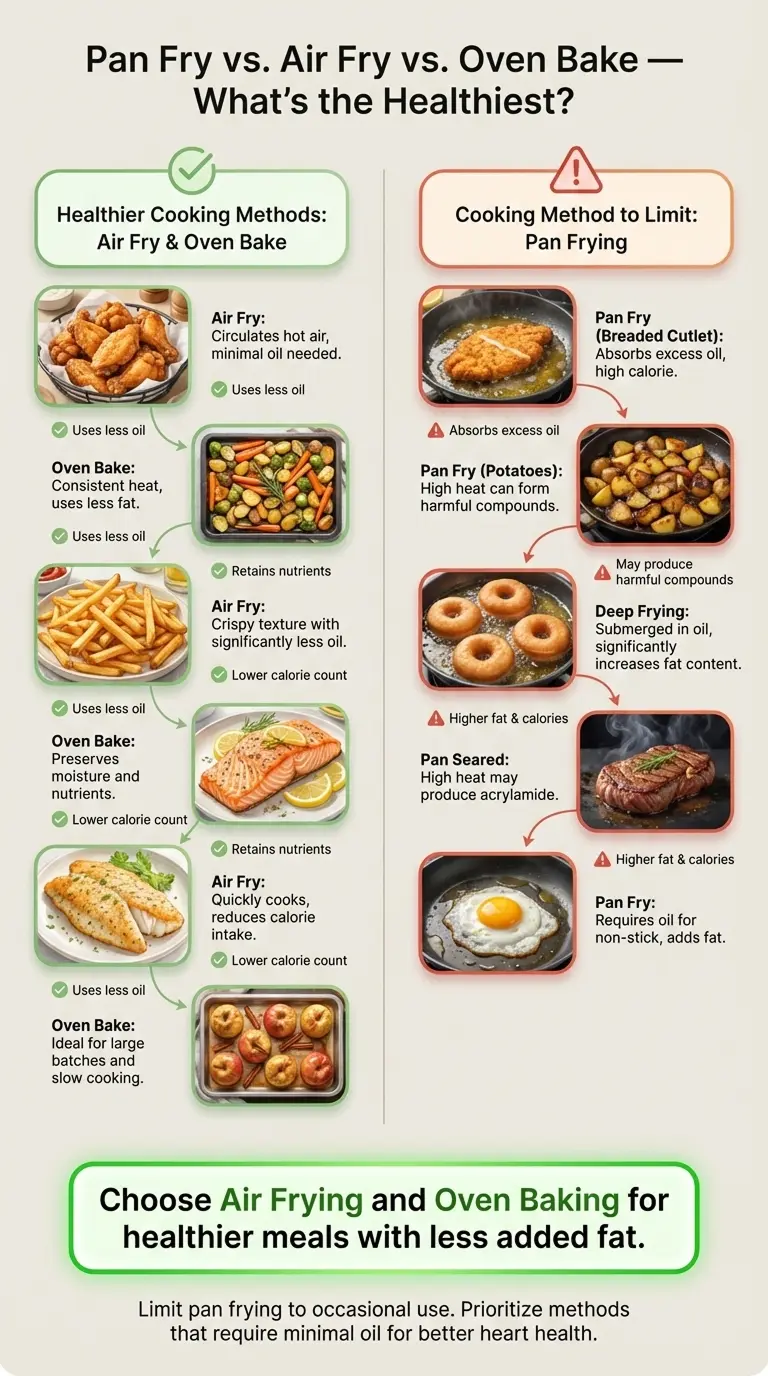
Quick Reference: Cooking Method Health Comparison
| Cooking Method | Oil Usage | Average Added Calories | Nutrient Retention |
|---|---|---|---|
| Pan Frying | 1-3 tablespoons | 120-360 calories | 60-75% |
| Air Frying | 1-2 teaspoons | 15-80 calories | 75-85% |
| Oven Baking | 0-1 tablespoon | 0-120 calories | 80-90% |
1. Pan Frying – The Traditional Searing Method
Best for: Proteins like chicken thighs, fish fillets, steaks, and vegetables that benefit from browning and caramelization
What you need: Heavy-bottomed skillet (cast iron or stainless steel), 1-3 tablespoons cooking oil with high smoke point (avocado, grapeseed, or canola oil), tongs or spatula
Step-by-step instructions:
- Heat your skillet over medium-high heat for 2-3 minutes until a drop of water sizzles and evaporates immediately
- Add oil and swirl to coat the bottom evenly – the oil should shimmer but not smoke
- Place food in the pan without overcrowding, leaving at least 1 inch between pieces
- Cook without moving for 3-5 minutes to develop a golden crust, then flip once
- Reduce heat to medium and continue cooking until internal temperature reaches safe levels
Why it works: Direct contact with hot oil creates the Maillard reaction at temperatures between 280-330°F, producing complex flavors and appealing textures while sealing in moisture
Pro tips:
- Pat proteins completely dry with paper towels before cooking to prevent oil splatter and achieve better browning
- Never move food too early – it will release naturally when properly seared, usually after 3-4 minutes
- Use a splatter screen to reduce oil spray while maintaining proper heat circulation
2. Air Frying – The Hot Air Circulation Method
Best for: Frozen foods, breaded items, small cuts of meat, vegetables, and reheating leftovers while maintaining crispiness
What you need: Air fryer with capacity matching your portion size, minimal oil (1-2 teaspoons maximum), food in single layer
Step-by-step instructions:
- Preheat air fryer to desired temperature for 3-5 minutes – most foods cook at 375-400°F
- Lightly spray or brush food with oil if needed for browning
- Arrange food in single layer in basket, ensuring air can circulate around each piece
- Cook for recommended time, shaking basket halfway through for even browning
- Check doneness with thermometer and add 1-2 minute increments if needed
Why it works: Rapid air circulation at 400°F+ creates convection currents that remove moisture from food surfaces while cooking evenly, mimicking deep-frying effects with minimal oil
Pro tips:
- Don’t overcrowd the basket – this blocks airflow and creates uneven cooking with soggy spots
- Flip or shake foods halfway through cooking time for consistent browning on all sides
- Reduce traditional oven temperatures by 25°F and cooking time by 20% when adapting recipes
3. Oven Baking – The Gentle Heat Method
Best for: Large batches, thick cuts of meat, whole vegetables, casseroles, and foods requiring slow, even cooking
What you need: Rimmed baking sheet or appropriate baking dish, parchment paper or light oil coating, oven thermometer for accuracy
Step-by-step instructions:
- Preheat oven to specified temperature and allow 15-20 minutes for full heat distribution
- Line baking sheet with parchment or lightly oil the surface
- Arrange food with space between pieces for air circulation
- Place on middle rack unless recipe specifies otherwise
- Rotate pan 180 degrees halfway through cooking for even browning
Why it works: Consistent ambient heat surrounds food from all directions, cooking slowly and evenly while allowing moisture to escape gradually for tender interiors
Pro tips:
- Use convection setting when available – it reduces cooking time by 25% and creates better browning
- Place oven rack in upper third for browning, lower third for gentle cooking
- Avoid opening oven door frequently as each peek releases 25-50°F of heat
4. Broiling – The High-Heat Finishing Method
Best for: Finishing touches, melting cheese, crisping surfaces, and quick-cooking thin proteins
What you need: Broiler-safe pan, oven rack positioned 4-6 inches from heating element, close monitoring
Step-by-step instructions:
- Preheat broiler for 5-10 minutes with oven door slightly ajar
- Position rack 4 inches from element for quick browning, 6 inches for gentler cooking
- Place food on broiler-safe pan and slide into oven
- Watch constantly – foods can go from perfectly browned to burnt in 30 seconds
- Remove immediately when desired color is achieved
Why it works: Intense radiant heat from above (500-550°F) quickly caramelizes surfaces while keeping interiors from overcooking
Pro tips:
- Never leave food unattended under the broiler – timing can vary dramatically based on distance and food thickness
- Pat proteins dry and score fatty skin to prevent flare-ups
- Use broiler as a finishing step after other cooking methods for optimal texture contrast
5. Steam-Roasting – The Moisture-Retention Method
Best for: Lean proteins, delicate vegetables, and foods that tend to dry out during cooking
What you need: Covered baking dish or foil tent, small amount of liquid (wine, broth, or water), aromatics like herbs or citrus
Step-by-step instructions:
- Preheat oven to 325-350°F for gentle cooking
- Place food in baking dish with 2-3 tablespoons liquid
- Add aromatics like lemon slices, herb sprigs, or garlic cloves
- Cover tightly with lid or foil to trap steam
- Remove cover for last 10-15 minutes if browning is desired
Why it works: Trapped steam creates a humid environment that prevents moisture loss while gentle heat cooks food evenly without harsh surface browning
Pro tips:
- Use this method for lean fish, chicken breasts, and vegetables that become tough when overcooked
- Add delicate herbs in the last 15 minutes to prevent them from becoming bitter
- Save the flavorful cooking liquid to use as a sauce or soup base
How to Choose the Right Cooking Method for Your Needs
Step 1: Consider Your Health Goals
Your primary health objectives should guide your cooking method selection, as each technique impacts nutrition differently.
- If reducing calories is priority: Choose air frying or oven baking, which require minimal added fats while maintaining flavor
- If maximizing nutrient retention: Use steam-roasting or gentle oven baking at lower temperatures to preserve heat-sensitive vitamins
- If managing heart health: Avoid excessive pan frying and focus on methods that don’t require additional oils
Step 2: Evaluate Your Time Constraints
Different methods require varying levels of active attention and total cooking time.
- If you need hands-off cooking: Oven baking allows you to set it and forget it while handling other tasks
- If speed is essential: Air frying typically reduces cooking time by 20-30% compared to conventional ovens
- If you want quick searing: Pan frying gives immediate results for thin cuts and small portions
Step 3: Match Method to Food Type
The structure and composition of your ingredients should determine the cooking approach.
- For thick, dense proteins: Oven baking ensures even cooking throughout without burning surfaces
- For delicate items: Steam-roasting prevents overcooking while maintaining moisture
- For achieving crispy textures: Air frying or pan frying create the surface reactions needed for crunch
Cooking Method-Specific Recommendations
For Chicken Breast
Best choice: Steam-roasting or gentle oven baking at 350°F
Why: Lean white meat dries out quickly with high-heat methods, but gentle cooking preserves moisture while ensuring food safety
Pro tip: Brine chicken for 30 minutes before cooking to increase moisture retention by up to 15%
For Fish Fillets
Best choice: Pan frying with minimal oil or gentle oven baking
Why: Fish cooks quickly and benefits from either quick searing to lock in moisture or gentle heat to prevent overcooking
Pro tip: Cook fish to 145°F internal temperature – it will continue cooking from residual heat after removal
For Root Vegetables
Best choice: Oven roasting at 425°F or air frying
Why: High heat caramelizes natural sugars while creating tender interiors, and both methods require minimal added fats
Pro tip: Cut vegetables uniformly and don’t overcrowd pans to ensure even browning
For Frozen Foods
Best choice: Air frying
Why: Rapid air circulation removes surface ice quickly while crisping exteriors, eliminating the sogginess common with other reheating methods
Pro tip: Don’t thaw frozen foods before air frying – cook directly from frozen for best texture
For Meal Prep Portions
Best choice: Oven baking on large sheet pans
Why: You can cook multiple servings simultaneously with consistent results and minimal active monitoring
Pro tip: Use parchment paper for easy cleanup and rotate pans halfway through for even cooking
For Quick Weeknight Dinners
Best choice: Pan frying or air frying
Why: Both methods cook quickly while developing appealing textures and flavors that satisfy without long preparation times
Pro tip: Prep ingredients during the day so you only need 10-15 minutes of active cooking time
For Entertaining Large Groups
Best choice: Oven baking or roasting
Why: Oven capacity allows cooking for multiple people simultaneously, and timing is more forgiving than stovetop methods
Pro tip: Use multiple oven racks and rotate positions halfway through cooking for consistent results across all portions
Expert Tips for Healthiest Cooking Results
Master Your Oil Selection and Usage
Choose oils based on their smoke points and nutritional profiles rather than just flavor. Avocado oil (520°F smoke point) works best for high-heat cooking, while extra virgin olive oil (375°F smoke point) is ideal for medium-heat applications and finishing. When air frying, use an oil spray bottle to control portions precisely – you typically need only 1-2 teaspoons total rather than tablespoons.
This approach can reduce your cooking oil consumption by 60-80% compared to traditional frying while maintaining flavor and texture. The key is applying oil strategically where browning is most important rather than coating everything uniformly.
Control Temperature Like a Professional
Invest in an instant-read thermometer and use it consistently – guessing internal temperatures leads to both food safety issues and overcooking. For proteins, remove them 5-10 degrees below target temperature and let carryover cooking finish the job. This technique prevents the dry, overcooked results that often drive people toward less healthy preparation methods.
Understanding that food continues cooking after removal from heat sources helps you achieve perfect doneness while preserving moisture and nutrients that high temperatures destroy.
Maximize Nutrient Retention Through Timing
Cook vegetables until just tender-crisp rather than soft – this preserves up to 50% more vitamin C and other water-soluble nutrients. For cruciferous vegetables like broccoli and Brussels sprouts, cooking times of 4-6 minutes maintain both nutritional value and appealing texture. Longer cooking times break down beneficial compounds like sulforaphane that provide anti-inflammatory benefits.
The visual cue is vibrant color – when vegetables lose their bright appearance, you’ve likely cooked away significant nutritional value along with optimal texture.
Harness the Power of Batch Cooking
Prepare larger quantities using oven baking methods, then portion and store properly for the week ahead. This strategy reduces your reliance on processed convenience foods while ensuring you always have healthy options available. Veggie chickpea power bowls work perfectly for this approach – roast all components at once, then mix and match throughout the week.
Batch cooking also allows you to control sodium, preservatives, and added sugars that appear in pre-made alternatives, often reducing these by 70% or more compared to restaurant or packaged options.
Create Flavor Without Excess Sodium
Build layers of flavor through proper browning, acid balance, and aromatic vegetables rather than relying on salt alone. The Maillard reaction from proper searing creates hundreds of flavor compounds that enhance taste perception without additional sodium. Finish dishes with a splash of acid (lemon juice, vinegar) to brighten flavors and reduce the need for salt.
This technique is particularly effective with air fryer salmon bites where proper browning and citrus finishing create satisfying flavors with minimal seasoning.
Understand Moisture Management
Different cooking methods handle moisture differently, and controlling this determines both texture and nutrient retention. Pat proteins dry before cooking to promote browning, but add moisture back through techniques like tenting with foil or adding aromatic liquids. Steam-roasting maintains 90% of water-soluble vitamins compared to 60% with dry-heat methods.
For vegetables, start with high heat to develop color, then reduce temperature and add a splash of liquid to finish cooking gently – this gives you both appealing appearance and maximum nutrition.
Time Your Seasoning Strategically
Salt proteins 20-40 minutes before cooking to allow proper penetration and moisture redistribution – this creates better flavor with less total sodium. For vegetables, add salt after cooking to prevent moisture loss during the cooking process. Delicate herbs should be added in the final minutes to preserve their volatile oils and nutritional compounds.
This timing approach ensures maximum flavor impact from your seasonings while preserving the nutritional integrity of your ingredients.
Optimize Your Equipment Setup
Preheat cooking surfaces properly – a properly heated pan or air fryer creates better browning with shorter cooking times, preserving more nutrients. Use the right size equipment for your portions – overcrowding leads to steaming instead of browning, while oversized equipment wastes energy and can cause uneven cooking.
Clean equipment performs better and requires less oil for non-stick properties. A well-seasoned cast iron pan or properly maintained non-stick surface reduces the need for cooking fats by 50% or more.
Plan for Proper Resting and Carryover Cooking
Allow proteins to rest after cooking – this redistributes juices and completes the cooking process gently. Large cuts need 10-15 minutes, while smaller portions need 3-5 minutes. This resting period prevents the common mistake of overcooking that drives people toward less healthy preparation methods to add moisture back.
Understanding carryover cooking means you can remove foods from heat sources earlier, reducing the formation of potentially harmful compounds that develop at very high temperatures while ensuring food safety.
Master the Art of Combination Cooking
Use multiple methods in sequence for optimal results – start with high heat for browning, then finish with gentle heat for even cooking throughout. This approach works particularly well with crispy smashed potatoes with garlic butter where initial boiling, smashing, then high-heat roasting creates perfect texture contrasts.
Combination cooking allows you to achieve complex textures and flavors while maintaining nutritional value and controlling added fats more precisely than single-method approaches.
Develop Your Sensory Cooking Skills
Learn to recognize doneness through sight, sound, and aroma rather than relying solely on timers. Properly cooked proteins will feel firm but not hard when gently pressed. Vegetables should maintain slight resistance when pierced with a knife. These skills prevent overcooking that destroys both nutrition and flavor.
The sizzling sound changes as moisture evaporates – when it becomes quieter, your food is likely approaching doneness. Visual cues like color changes and surface texture development indicate proper cooking progress better than arbitrary time guidelines.
Store and Reheat Strategically
Proper storage maintains the nutritional benefits of your healthy cooking methods. Cool foods quickly after cooking, store in appropriate containers, and reheat gently to preserve texture and nutrients. Loaded baked potato soup actually improves in flavor after a day in the refrigerator and reheats beautifully with gentle warming.
When reheating, use lower temperatures and add moisture if needed – this prevents the degradation that often leads people to choose less healthy convenience options for subsequent meals.
Frequently Asked Questions
Which cooking method burns the most calories during food preparation?
Pan frying burns the most calories during preparation because it requires active stirring, flipping, and constant attention. You’ll burn approximately 80-120 calories per 30 minutes of cooking, compared to 40-60 calories for air frying and 20-30 calories for oven baking.
However, this small calorie burn during cooking is negligible compared to the calorie differences in the final food. The cooking method’s impact on your food’s nutritional content matters far more than the energy you expend while cooking.
Can I get crispy results without any oil using these methods?
Air frying and oven baking can achieve crispy textures without added oil, especially with naturally fatty foods like chicken thighs or salmon. For lean proteins and vegetables, a light spray of oil (1-2 calories per spray) helps achieve better browning and crispiness.
Pan frying requires some fat to prevent sticking and achieve proper browning, but you can use minimal amounts—just enough to coat the pan. Water-based cooking liquids like broth can also create interesting textures when pan frying.
Does air frying really preserve more nutrients than other methods?
Air frying preserves water-soluble vitamins better than boiling or steaming because no cooking liquid carries nutrients away. However, oven baking at similar temperatures preserves nutrients equally well. The key factor is cooking time and temperature, not the specific method.
For maximum nutrient retention, keep cooking times short and temperatures moderate across all methods. Air frying’s advantage lies in speed—shorter cooking times mean better vitamin preservation, especially for vitamin C and B vitamins.
Which method works best for meal prep and batch cooking?
Oven baking wins for meal prep because you can cook large quantities simultaneously using multiple sheet pans. You can prepare 4-6 servings of protein and vegetables in one session, making it ideal for weekly meal preparation.
Air fryers work well for reheating meal-prepped foods, restoring crispiness better than microwaves. Pan frying works best for fresh, single-serving meals but becomes time-consuming for batch cooking. Consider combining methods—oven bake for prep, air fry for reheating.
How do cooking times compare between these three methods?
Air frying typically cooks 25-30% faster than oven baking due to concentrated heat circulation. Pan frying offers the fastest cooking for thin cuts of meat and quick-cooking vegetables, but requires more active attention.
For example, chicken breast takes 12-15 minutes in an air fryer, 18-22 minutes in a 400°F oven, and 6-8 minutes per side when pan fried. Oven baking takes longest but allows multitasking, while pan frying demands constant monitoring.
Are there foods that should never be cooked using certain methods?
Avoid air frying wet batters, loose breadings, or foods with high water content like fresh tomatoes—they’ll create a mess and won’t cook properly. Leafy greens become overly crispy and bitter in air fryers.
Don’t pan fry foods with high water content without proper preparation, as they’ll steam rather than brown. Large, thick cuts of meat work better in the oven than on the stovetop, where they may burn outside before cooking through. Each method has its strengths when matched to appropriate foods.
What about the environmental impact of these cooking methods?
Air fryers and smaller countertop ovens use less energy than full-size ovens for small portions, making them more environmentally friendly for 1-2 servings. However, full ovens become more efficient when cooking larger quantities.
Pan frying on gas stovetops uses less energy than electric methods, while induction cooktops offer the highest energy efficiency. Consider portion size when choosing—small batches favor air frying or stovetop methods, while large batches make oven baking the greener choice.
Can I achieve restaurant-quality results at home with these methods?
Each method can produce restaurant-quality results when used properly. Pan frying excels at creating perfect sears and caramelization, similar to professional kitchens. Oven baking allows for consistent, even cooking that many restaurants rely on for volume cooking.
Air frying creates exceptionally crispy exteriors that rival deep frying. The key lies in understanding temperature control, timing, and proper seasoning. Professional techniques like preheating pans, using high-heat oils, and resting proteins apply regardless of your chosen method.
How do I know when my food is properly cooked using each method?
Use a digital instant-read thermometer for all methods—internal temperature matters more than cooking time. Chicken should reach 165°F, pork 145°F, and beef varies by preference (135°F for medium-rare).
Visual cues help too: properly cooked proteins feel firm when pressed, vegetables should be tender-crisp, and surfaces should show appropriate browning. Air-fried foods sound less “sizzling” when moisture has evaporated, while oven-baked items pull slightly from pan edges when done.
Which method is most beginner-friendly for new cooks?
Air frying offers the most forgiving learning curve because it’s harder to overcook food, and the enclosed environment prevents splattering. The circulating air provides even cooking with minimal technique required.
Oven baking ranks second for beginners—set the temperature, add food, and wait. Pan frying requires the most skill development, including heat control, timing, and technique for flipping and stirring. Start with air frying or oven baking to build confidence, then progress to pan frying as your skills develop.
Conclusion
The healthiest cooking method depends on your specific goals, available time, and the foods you’re preparing. Air frying and oven baking generally offer the best combination of minimal added fats, nutrient preservation, and consistent results, while pan frying provides unmatched flavor development when used skillfully.
For most home cooks, air frying emerges as the sweet spot—it requires less oil than traditional frying, cooks faster than oven baking, and produces reliably crispy results with minimal technique required. However, the “healthiest” choice ultimately comes down to how each method fits into your overall eating pattern and lifestyle.
Remember that cooking method matters less than what you’re actually cooking. A nutrient-dense meal prepared with any of these methods beats processed foods every time. The best cooking method is simply the one you’ll use consistently to prepare wholesome, home-cooked meals.
Don’t feel pressured to choose just one approach—successful home cooks master multiple techniques and match them to specific foods and situations. Whether you’re making quick air-fryer salmon bites for a weeknight dinner or slow-roasting vegetables for meal prep, having options makes you a more versatile and confident cook.
Start experimenting with these methods today, and you’ll quickly discover which techniques work best for your favorite foods and cooking style.